Boost Summer Sales for Small Business

Are you looking for a way to boost your sales this summer? We’ve got news for you! The latest of our vertical market sales kits is here, giving you a chance to speak directly to the print needs of small businesses. Here’s what you need to know about this new kit.

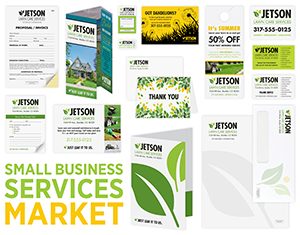
small business kit brochure, business cards, announcements, letterhead, forms, postcards, announcements

What’s In It?
We’ve created this kit around a lawn care business, and all of the products are hand-picked for that market. Practical pieces like business cards, forms, and letterhead are just the start. “Thank you” notes can help build rapport with customers at the end of the season, brochures are a great way to inform prospective customers of new services, and other pieces like Post-it® Notes and door hangers make great leave-behinds if your customer is going door-to-door to drum up business.

These products might be tailored for lawn care, but they’re a great fit for a wide variety of small businesses looking to give a boost to their marketing strategy. Use the kit as an example of how your customer could create a complete print suite no matter what market they’re working in.

How Can You Use It?
Ready to put this sales kit to work? Be sure to bring it with you when you meet with potential customers, especially if you work often with small businesses. It’s also important to keep the samples within reach for when customers walk into your storefront, because you never know when a small business owner will reach out to you.

These kits can be used for much more than samples, though. They are also a great way to highlight cross-selling opportunities. Did your customer come to you for letterhead and business cards to stock up for the summer season, for example? This kit will show them how they could create other print pieces to give their small business an additional boost.

Ready for the Summer Slump
With so many people heading out on vacation, summer can be a slow season. That’s why we are debuting this kit now. A new sales tool for reaching out to a new market could help you connect with new customers even during a slow season.

Best of all, this new sales kit is available free of charge. Simply contact your customer care team to request yours or visit our website to request a kit online.

What do you think of this new sales kit? We’d love to see you join the conversation in the comments below.
Quiz: Do You Know the History of Promotional Products

Summer is coming soon, and that means it’s time for your customers to purchase promotional products for their summer events. You might not realize this, but the promotional products industry has a long history. Do you know that history? Take this quiz to find out.

1. The history of promotional products goes a long way back, and got its start in the earliest US elections. What year’s election saw the first commemorative button?
A) 1789
B) 1792
C) 1796
D) 1800

2. That wasn’t the end of campaign buttons. Who was the first presidential candidate to have the image of their face featured on a button?
A) Andrew Jackson
B) Abraham Lincoln
C) Teddy Roosevelt
D) Ulysses S. Grant

3. Promotional products have been around for a long time, but one businessman is most often credited as the first to produce them commercially in the late 1800s. What was his name?
A) Isaac Young
B) Abraham Brown
C) Jasper Meek
D) Everett Hill

4. If you work in the promotional products industry, you know that there are a variety of different trade associations. Which organization got that started?
A) Advertising Specialties Institute (ASI.
B) Promotional Products Association International (PPAI.
C) Upper Midwest Association of Promotional Professionals (UMAPP.

5. Sometimes promotional products are popular enough to become products on their own. Which of these products got their start as a promotional offer?
A) Hall’s cough drops
B) McDonalds hamburgers
C) Singer sewing needles
D) Wrigley’s chewing gum

ANSWERS:
1) A. The first promotional item in US history was a commemorative button made for the George Washington in the election of 1789.
2) B. Abraham Lincoln was the first presidential candidate to have his face featured on a campaign button.
3) C. In the late 1800s, Jasper Meek wanted to keep his newspaper presses running during slow times. He then started printing burlap bags with advertising messages. A local shoe store then gave them to school children to promote his business.
4) B. PPAI got its start as the Advertising Manufacturers Association in 1904. ASI got its start in 1950.
5) D. Believe it or not, Wrigley’s sold baking powder before their promotional gum became a smash hit. Their baking powder was also a promotional product that was a hit; they originally sold soap.

The promotional products industry has come a long way since the commemorative buttons in the 1789 election. With nationwide trade organizations, tradeshows, and publications, it is now a booming business, and we’re happy to be a part of it!

What’s the most memorable promotional product you have ever received? How did you do on the quiz? We’d love to see you join in the conversation in the comments below.

Have a More Effective Team Meeting in 4 Steps

Whether you’re hosting a staff meeting or are kicking off a new project with the team working on it, a team meeting can be a great use of your time. However, if your meetings aren’t achieving what you want, it’s time to rethink how you run your team meetings. Here are four simple steps that will help you get more out of your meetings.

1. Start with A Goal
Every meeting has to have a purpose, whether you’re starting up a project or just keeping everyone updated on the projects that your department is working on, and keeping that goal in mind is essential. Staying focused on your goal will help ensure that you get the most out of your meeting. If you don’t have a goal, though, the time you would otherwise have used for a meeting might be better spent on other tasks.

2. Make Sure Everyone Has Been Introduced
The best start to your meeting is ensuring that everyone in the team has been introduced. This is especially important if you’re bringing together a team of employees who don’t work together often or if a new employee is joining you. Introducing everyone isn’t just a get-to-know-you, though—it ensures that everyone knows who to call when they need to follow up on important information.

3. Assign Roles
While a meeting works best when everyone participates, consider assigning roles to keep everything moving smoothly. One person should be leading the conversation, for example, to ensure that you stick to the topics that need to be covered. This also ensures that there’s one person who can wrangle distracted meeting attendees if you start having multiple conversations.

Leading the meeting isn’t the only job, though. If someone isn’t able to make it to the meeting, make sure someone is taking notes for them. If you’ve got a lot to cover, have one person keep track of time and remind everyone when the end time has almost arrived.

4. End When You’ve Said You’ll End
Your day is busy, and so are the days of your meeting attendees! That’s why it’s so important to do your best to end meetings when you’ve said you’ll end them. It’s possible that your meetings might run long, but if you’re constantly running over end times you’re probably trying to cram too much into your meetings.

How do you make the most of your team meetings? Do you have any tips you’d like to share? We’d love to see you join the conversation in the comments below.

Your How-To Guide for Enhanced Finishes

You’ve heard about Navitor’s new enhanced finishes products—are you ready to design them? Today we’re taking you through how to create enhanced finishes files, step by step.

1. Know Your Resources!
We know it can be daunting to create the designs for our enhanced finishes products at first—that’s why we have created a few resources that could help you navigate the design process more effectively. If you want to spend some time getting to know the process, we recommend visiting our website for downloadable file creation tutorials.

You can also use these documents with your customers when they are creating their own designs. The unbranded documents feature all of the file requirements for each print process, making them an excellent option for customers who want to get hands on with the design process themselves.

Are you more of a visual learner? We’ve got you covered there, too—watch this video created by one of our graphic designers to see the process step by step!

2. Download Your Enhanced Finishes Swatch Library
Ready to get started? Start by downloading the swatch library from the Enhanced Finishes page on Navitor.com.

3. Open Your Full Color Design and the Enhanced Finishes Swatch Library
A full color design is the foundation of your enhanced finishes design, so start with that full color design. Then, once the base design is ready to go, open up the swatch library you downloaded in step two.

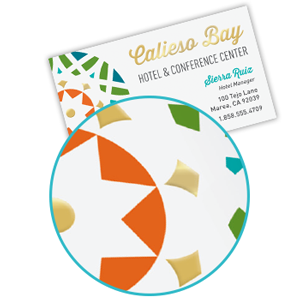
how to design enhanced finishes spot uv gloss, raised gold silver foil, raised spot ultraviolet gloss

4. Create a New Layer For Enhanced Finishes
Whatever design elements you want to bring spot gloss, raised spot gloss, or raised foil to, create a new layer and place them there. Next use one of the various enhanced finish swatches to color the elements then from attributes set them to “Overprint Fill” so they receive the enhanced finish.

5. Create Your Press File
Your design is ready to go! Double-check to ensure that your file will be created using CMYK color and export the file!

6. Still Not Sure? Order One.
We know that you might want a bit of extra practice before you are ready to place your full order, which is why we offer you the option to order a single print piece. This press proof gives you the chance to review your design for a small fee and adjust as needed.

What do you love most about our new enhanced finishes business cards, announcements, and postcards? We’d love to see you join the conversation in the comments below.

3 Tips For Next Year’s Tax Season

Take a deep breath. Tax season is over and you can take a moment to relax. Breathe a sigh of relief. Have a cup of coffee.

And now that you’ve had your moment, it’s time to start preparing for next year.

As much as you are probably glad that tax season is over for the year, it’s a great idea for you to start thinking about how to make next year’s tax season come together with ease. Here are our 3 tips for things that you can do now to make the next tax season go smoothly.

1. Start Preparing Now
Remember that bit of panic that started when you started your taxes for the year? Get ahead of that stress by starting early. Keep your paperwork organized in a way that will make it easy to use when tax season comes around. Update your spreadsheets periodically. And, when tax season comes up, get your paperwork done with plenty of time to spare. Not only will preparing early allow you to get your taxes done quicker, but it will also give you extra time to handle unexpected questions that might come up.

And speaking of that preparation…

2. What Stressed You Out This Year? Take Note of it For Next Year
This is probably the simplest way to make next spring go more smoothly for your tax preparation process: if anything caused you additional stress this year, that’s the first thing you should try to improve for next year. Did you have to track down a number of digital invoices last minute, for example? Consider printing those invoices to file with physical documents or keep them on file in a designated folder. If you can create better habits throughout the year, you can decrease your stress for all future tax seasons.

3. Stay Up-To-Date on Tax Law Changes
Tax law is always changing, and it’s much easier to read up on the legal changes once every month than it is to try to catch up come 2020. Do your best to stay up do date on any changes to tax law that might be relevant to your business and you won’t be blindsided come tax season.

Do you have tips for other things that business owners can do to get ahead of next year’s tax season? We’d love to see you join the conversation in the comments below.

The Importance of a Well-Coordinated Stationery Suite

Your customers come to you for a lot of different reasons. Maybe they need business cards for an upcoming event. Maybe they have to create a brochure for a new product. Maybe they want folders to keep organized at their business. However, if your customers are ordering their stationery pieces individually, they might not be taking advantage of the benefits that can come from coordinating their print pieces with each other.

Make Their Business Look More Put-Together
This is the biggest reason for your customers to coordinate their print pieces. When their print pieces look coordinated, it makes their entire business look a little more polished and organized by extension. This starts with their more traditional pieces, of course—a well-matched stationery set is the foundation of professional corporate communications.

Your customer can also extend this idea to other pieces. From keeping offices organized to presenting ideas to customers, branded folders can add a special touch to your customer’s print order. When the time comes for your customers to send out announcements for company news or invitations for their next big event, creating announcements that coordinate with their existing stationery can be a great way of ensuring the event feels connected to your customer’s brand. And when your customer matches their brochuressales sheets, and rack cards to their other print pieces, it will make sure your customer’s brand is top of mind when their clients think of the new products and services that those print pieces promoted.

Create the Right Mood with Every Print Piece
When your customer coordinates all of their print pieces, it ensures that every piece creates the right feel. After all, once your customer has chosen a business card stock that conveys quality or a print process that creates just the right look for their brand, it’s easy to create that same feel by matching other pieces to that business card.

That doesn’t mean they all have to look exactly alike, though. By using an accent color, on the other hand, your customer’s stationery suite will continue to look cohesive but have a more varied, creative look. This is an ideal option for customers who want to convey a lively, friendly, or artistic personality with their print pieces.

Make Your Customer’s Brand Instantly Recognizable
The more your customer’s brand is seen, the bigger the benefits for their business. This means that every piece of print that they send out—from the branded business envelope that holds an invoice to the business card that accompanies a sales representative to an official meeting—is a chance for one more impression. Not only does this make your customer’s brand more recognizable, it keeps their brand top of mind for their clients.

What are your customer’s favorite print pieces? We’d love to see you join the conversation in the comments below.

5 Tips for Designing a Better Sales Sheet

designing a better sales sheet, flyer, personalized printed newsletter, full color sell sheetWhen your customer is creating an informational flyer, a sales sheet for meetings, or a company newsletter, it’s important that their design guides readers through the information and makes it easy—and enticing—to take the next step. If they come to you for guidance on designing their sales sheets, it’s important that you know how to make their sales sheet effective. Here are our tips for designing a better sales sheet.

1. Start With What You Want Your Flyer to Achieve
No matter how stylish your customer wants their flyer to be, it’s important to remember that every print piece has a purpose. That purpose needs to be the foundation of the design for your customer’s flyer. The information and images on that flyer need to support your customer’s goal, and anything that doesn’t should be left out.

2. Keep Things Easy to Read
Whether your customer wants their sales sheet to be text heavy or wants to let images take the spotlight, it’s important that their text is easy to read. Keep information concise, and choose simple, readable fonts that will make the sales sheet easier to scan.

This goes double for your customer’s contact information. You want anyone reading their flyer to be able to find this information as easily as possible, whether that means putting their web address in a bold font or leaving white space around that information to ensure that it is easy to pick out among the other text on the flyer.

3. Short on Space? Make a Grid!
One of the easiest ways to make a flyer readable and easy-to-navigate is to make it in a grid. Not only does using a grid make it easier to budget your space during the design process, it also is a style your customer will be familiar with and that will make it easy for them to quickly read and absorb the information.

And if your customer wants to change things up, consider placing that grid at an angle, tilted slightly. You will still have the easy organization and readability, but the angle will add a touch of visual interest.

4. Add Color
When your customer wants to create an informational piece, color is key! Use blocks of color to emphasize text or important ideas, use one or two photographs to add visual interest, or use your customer’s brand colors to add a splash of recognizable color. Color is a great way to reinforce the message of the sales sheet and make it more entertaining to read.

5. Have a Call to Action
What’s the next step? You don’t want readers to have any doubts about what to do next once they’ve read the sales sheet. Highlight your customer’s website, an “order today!” message, or other information to make that next step clear.

What do you think makes an effective sales sheet? We’d love to see you join the conversation in the comments below.

4 Communication Mistakes That Can Ruin Your Meetings

communication mistakes that could ruin your personalized print staff meetings, sales meetings and moreWhen you carve out time in your busy schedule to hold a meeting, you want to make sure you use your time effectively and make the most of your time together. However, if you aren’t communicating well, you might be ruining your meetings. Are you making these mistakes—and do you know how to keep them from ruining your meetings?

1. Forgetting the Important Information
If you have important information that should be reviewed before the meeting starts, don’t forget to share it! Not only will this ensure that everyone is on the same page, but it will also save you time in summarizing that information.

2. Having Too Few People at Your Meeting
Have you ever been at a meeting and, midway through, wished that you’d included someone? Sometimes, your meeting can grind to a halt when you don’t have that person there, even if you’re able to track them down or reschedule.

However, there are definitely ways to keep this from making too big of an impact. Did you forget someone important? Was someone not able to be there? Make sure that you take the time to catch up with them after the meeting. This can mean taking notes of all the decisions made at that meeting, keeping note of the questions that you want to ask them, and the pros and cons of undecided issues.

Of course, having too few people at your meeting isn’t the only numbers issue you might face…

3. Having Too Many People At Your Meeting
If you’ve been to enough meetings, you’ll probably have come across an overstuffed meeting before and be very familiar with the issues that these meetings face. It can be hard, with so many people, to have important points heard. And if your meeting has too many people in it, you might find yourself facing another issue…

4. Having Multiple Relevant Conversations Going on At Once
Have you ever been to a meeting where the attendees walked out of the meeting feeling like the group came to very different conclusions? One of the reasons for this might be that the meeting splintered into a few different conversations. This can easily lead to different attendees hearing different information and coming to different conclusions about what the next step is, and that can be a big problem for your projects.

So how can you fix this when two groups of people within the meeting need to address focused points? Don’t just let the meeting wander off into multiple conversations. Instead be intentional when these conversations break off, and make sure to share the decisions with the group when you come back together.

Have you made these communication mistakes? Are we missing a mistake that has impacted your meeting? We’d love to see you join the conversation in the comments below.

3 Ways to Use Spot Gloss Print

A few weeks ago we debuted our new selection of enhanced finishes, and we wanted to take a moment to highlight how you and your customers can use one of those finishes to create striking design. Spot gloss—also called spot UV—applies a shiny, flat coating to specific areas of a design, and it could be just what your customer needs to make their announcement, business card, or postcard a striking success.

1. Emphasize Design Elements
We’ve paired our enhanced finishes with full color print, so it is easy for your customer to emphasize just the most important elements of their design. Gloss can be applied over a full color logo, the most important text in the design, or even specific elements of an illustration like the moon in a starry sky. This use for spot gloss print has become increasingly popular in recent years, and you might have seen spot gloss adding a bit of extra shine to specific areas of book covers or business cards.

2. Add Accent to Solid Blocks of Color
If your customer is looking for a way to add spot gloss to their print piece, adding spot gloss to an area of solid color could also be a great addition. Consider printing a spot gloss version of your customer’s logo over a solid block of color for an unexpected design element or add a pattern like stripes or dots to a color block border.

The shine of spot gloss will provide the greatest contrast when applied over a darker or more saturated color, but spot gloss can also be striking on lighter colors. And speaking of light colors…

3. Let Gloss Take Center Stage
Whether your customer is looking for an unexpected design element or loves a minimalist look, spot gloss could help them create a stylish print piece all on its own. When spot gloss is applied to white stock in lieu of ink, it creates a design element that commands attention. It’s a good way to create a subtle design on the front of an announcement or use spot gloss to show off your customer’s logo on one side of their business card.

If you’re using spot gloss as the central element of the design, think about it like spot color printing, but the color is a clear shine.

Want to promote this print process to your customers? We’ve created this flyer to help you show off what spot gloss print can do. And, when you’re ready to order, you can order either through our catalog or on Navitor.com.

What do you like best about the look of spot gloss? We’d love to see you join the conversation in the comments below.

Add Style with Engraved Portfolios

Are your customers looking for a way to celebrate big events or for the perfect gift to impress their most important clients? Personalized portfolios make a perfect gift for the busy executive, new graduate, and much more. Are these stylish personalized pieces right for your customer?

Personalized and Practical
One of the biggest reasons for your customer to consider engraved portfolios is that they are as practical as they are stylish. Each one includes a wide ruled memo pad, three inside pockets for easy storage of pens or other daily essentials, and a business card slot. All of this makes the portfolio a great fit for anyone who might need to take notes at meetings, keep track of top points for presentations, and more.

All this practicality comes with lots of personalization potential, too. Personalizing your customer’s portfolio starts with choosing from three shades of faux leather and two different sizes. Engraving extends that personalization potential with a design in the center or corner of the faux leather cover. These engraved designs can feature logos, monograms, text, and more.

An Elegant Gift for Big Events
Because portfolios evoke polish and professionalism, they’re a great fit for special occasions like graduation. After graduation, portfolios are a polished way for new entrants to the workforce to keep notes and a spare copy of their resume on hand for interviews. They are also an excellent way to celebrate new jobs, especially jobs in industries that value that extra bit of elegance like positions at law firms or agencies.

Honor Employees or Impress Important Contacts
While portfolios are a common gift for occasions like graduations, they are a great fit for a wide variety of different elegant gifts. Does your customer have a top employee who they want to recognize? A portfolio is a gift that shows how much they appreciate those efforts. Do they want to impress a client with a gift at a big meeting? Elegant engraved portfolios could be the perfect finishing touch to their sales pitch.

Ready to learn more? Take a look at our catalog for more information.

Have your customers ordered these portfolios yet? What do they like most about them? We’d love to see you join the conversation in the comments below.