4 Reasons to Consider Raised Foil

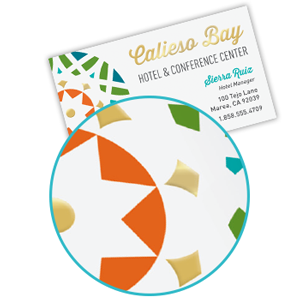
A few weeks ago we told you about what spot gloss print can do, and now we want to introduce you to raised foil! Raised foil is a versatile addition to your customers’ print pieces that is sure to attract attention. Here are four reasons they should consider adding raised foil to their next business card, announcement, or postcard order.

1. More Color for More Creativity
We debuted raised foil with nine different colors to choose from because we understand that more options allow you to connect with more customers. With classic gold and silver metallic—shiny or dull—and a variety of other colors including eye-catching silver holographic foil, your customer has the variety of foil colors they need to create just the look they’re looking for.

And speaking of color…

2. Bring the Shine of Foil to Full Color
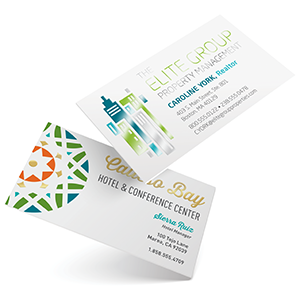
Does your customer love the versatility of full color but want the elegance of foil? Do they want to bring their favorite foil style to new heights? Do they want to give their full color brand style an upgrade? Raised foil is a great way to do just that. Because raised foil is paired with full color print, your customer has a broad palette of color to play with in both foil and ink. They can add foil accents to full color images, add foil text to vibrant photographs, and much more.

3. Foil with Fine Detail
Not only does raised foil give your customer a variety of options for color, it also gives them a variety of options for design. Whether they are looking for bold foil designs or fine detail, raised foil delivers. If you want to know more about the best ways to design for raised foil, take a look at this design guide for more information.

4. You Can Be Sure of Your Design
We understand that these new print processes can be daunting—that’s why we offer the opportunity for you to order a single business card, announcement, or postcard. This allows you to check a printed proof of the design for a small fee before committing to your order, and it allows you to adjust the design as needed for a small additional fee for each proof.

Want to promote this print process to your customers? We’ve created this flyer to help you show off what raised foil print can do. And, when you’re ready to order, you can order either through our catalog or on Navitor.com.

What do you like best about raised foil? We’d love to see you join the conversation in the comments below.
Your How-To Guide for Enhanced Finishes

You’ve heard about Navitor’s new enhanced finishes products—are you ready to design them? Today we’re taking you through how to create enhanced finishes files, step by step.

1. Know Your Resources!
We know it can be daunting to create the designs for our enhanced finishes products at first—that’s why we have created a few resources that could help you navigate the design process more effectively. If you want to spend some time getting to know the process, we recommend visiting our website for downloadable file creation tutorials.

You can also use these documents with your customers when they are creating their own designs. The unbranded documents feature all of the file requirements for each print process, making them an excellent option for customers who want to get hands on with the design process themselves.

Are you more of a visual learner? We’ve got you covered there, too—watch this video created by one of our graphic designers to see the process step by step!

2. Download Your Enhanced Finishes Swatch Library
Ready to get started? Start by downloading the swatch library from the Enhanced Finishes page on Navitor.com.

3. Open Your Full Color Design and the Enhanced Finishes Swatch Library
A full color design is the foundation of your enhanced finishes design, so start with that full color design. Then, once the base design is ready to go, open up the swatch library you downloaded in step two.

how to design enhanced finishes spot uv gloss, raised gold silver foil, raised spot ultraviolet gloss

4. Create a New Layer For Enhanced Finishes
Whatever design elements you want to bring spot gloss, raised spot gloss, or raised foil to, create a new layer and place them there. Next use one of the various enhanced finish swatches to color the elements then from attributes set them to “Overprint Fill” so they receive the enhanced finish.

5. Create Your Press File
Your design is ready to go! Double-check to ensure that your file will be created using CMYK color and export the file!

6. Still Not Sure? Order One.
We know that you might want a bit of extra practice before you are ready to place your full order, which is why we offer you the option to order a single print piece. This press proof gives you the chance to review your design for a small fee and adjust as needed.

What do you love most about our new enhanced finishes business cards, announcements, and postcards? We’d love to see you join the conversation in the comments below.

The Importance of a Well-Coordinated Stationery Suite

Your customers come to you for a lot of different reasons. Maybe they need business cards for an upcoming event. Maybe they have to create a brochure for a new product. Maybe they want folders to keep organized at their business. However, if your customers are ordering their stationery pieces individually, they might not be taking advantage of the benefits that can come from coordinating their print pieces with each other.

Make Their Business Look More Put-Together
This is the biggest reason for your customers to coordinate their print pieces. When their print pieces look coordinated, it makes their entire business look a little more polished and organized by extension. This starts with their more traditional pieces, of course—a well-matched stationery set is the foundation of professional corporate communications.

Your customer can also extend this idea to other pieces. From keeping offices organized to presenting ideas to customers, branded folders can add a special touch to your customer’s print order. When the time comes for your customers to send out announcements for company news or invitations for their next big event, creating announcements that coordinate with their existing stationery can be a great way of ensuring the event feels connected to your customer’s brand. And when your customer matches their brochuressales sheets, and rack cards to their other print pieces, it will make sure your customer’s brand is top of mind when their clients think of the new products and services that those print pieces promoted.

Create the Right Mood with Every Print Piece
When your customer coordinates all of their print pieces, it ensures that every piece creates the right feel. After all, once your customer has chosen a business card stock that conveys quality or a print process that creates just the right look for their brand, it’s easy to create that same feel by matching other pieces to that business card.

That doesn’t mean they all have to look exactly alike, though. By using an accent color, on the other hand, your customer’s stationery suite will continue to look cohesive but have a more varied, creative look. This is an ideal option for customers who want to convey a lively, friendly, or artistic personality with their print pieces.

Make Your Customer’s Brand Instantly Recognizable
The more your customer’s brand is seen, the bigger the benefits for their business. This means that every piece of print that they send out—from the branded business envelope that holds an invoice to the business card that accompanies a sales representative to an official meeting—is a chance for one more impression. Not only does this make your customer’s brand more recognizable, it keeps their brand top of mind for their clients.

What are your customer’s favorite print pieces? We’d love to see you join the conversation in the comments below.

5 Tips for Designing a Better Sales Sheet

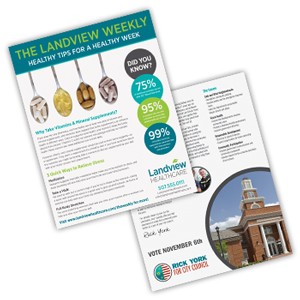
designing a better sales sheet, flyer, personalized printed newsletter, full color sell sheetWhen your customer is creating an informational flyer, a sales sheet for meetings, or a company newsletter, it’s important that their design guides readers through the information and makes it easy—and enticing—to take the next step. If they come to you for guidance on designing their sales sheets, it’s important that you know how to make their sales sheet effective. Here are our tips for designing a better sales sheet.
1. Start With What You Want Your Flyer to Achieve
No matter how stylish your customer wants their flyer to be, it’s important to remember that every print piece has a purpose. That purpose needs to be the foundation of the design for your customer’s flyer. The information and images on that flyer need to support your customer’s goal, and anything that doesn’t should be left out.

2. Keep Things Easy to Read
Whether your customer wants their sales sheet to be text heavy or wants to let images take the spotlight, it’s important that their text is easy to read. Keep information concise, and choose simple, readable fonts that will make the sales sheet easier to scan.

This goes double for your customer’s contact information. You want anyone reading their flyer to be able to find this information as easily as possible, whether that means putting their web address in a bold font or leaving white space around that information to ensure that it is easy to pick out among the other text on the flyer.

3. Short on Space? Make a Grid!
One of the easiest ways to make a flyer readable and easy-to-navigate is to make it in a grid. Not only does using a grid make it easier to budget your space during the design process, it also is a style your customer will be familiar with and that will make it easy for them to quickly read and absorb the information.

And if your customer wants to change things up, consider placing that grid at an angle, tilted slightly. You will still have the easy organization and readability, but the angle will add a touch of visual interest.

4. Add Color
When your customer wants to create an informational piece, color is key! Use blocks of color to emphasize text or important ideas, use one or two photographs to add visual interest, or use your customer’s brand colors to add a splash of recognizable color. Color is a great way to reinforce the message of the sales sheet and make it more entertaining to read.

5. Have a Call to Action
What’s the next step? You don’t want readers to have any doubts about what to do next once they’ve read the sales sheet. Highlight your customer’s website, an “order today!” message, or other information to make that next step clear.

What do you think makes an effective sales sheet? We’d love to see you join the conversation in the comments below.

3 Ways to Use Spot Gloss Print

A few weeks ago we debuted our new selection of enhanced finishes, and we wanted to take a moment to highlight how you and your customers can use one of those finishes to create striking design. Spot gloss—also called spot UV—applies a shiny, flat coating to specific areas of a design, and it could be just what your customer needs to make their announcement, business card, or postcard a striking success.

1. Emphasize Design Elements
We’ve paired our enhanced finishes with full color print, so it is easy for your customer to emphasize just the most important elements of their design. Gloss can be applied over a full color logo, the most important text in the design, or even specific elements of an illustration like the moon in a starry sky. This use for spot gloss print has become increasingly popular in recent years, and you might have seen spot gloss adding a bit of extra shine to specific areas of book covers or business cards.

2. Add Accent to Solid Blocks of Color
If your customer is looking for a way to add spot gloss to their print piece, adding spot gloss to an area of solid color could also be a great addition. Consider printing a spot gloss version of your customer’s logo over a solid block of color for an unexpected design element or add a pattern like stripes or dots to a color block border.

The shine of spot gloss will provide the greatest contrast when applied over a darker or more saturated color, but spot gloss can also be striking on lighter colors. And speaking of light colors…

3. Let Gloss Take Center Stage
Whether your customer is looking for an unexpected design element or loves a minimalist look, spot gloss could help them create a stylish print piece all on its own. When spot gloss is applied to white stock in lieu of ink, it creates a design element that commands attention. It’s a good way to create a subtle design on the front of an announcement or use spot gloss to show off your customer’s logo on one side of their business card.

If you’re using spot gloss as the central element of the design, think about it like spot color printing, but the color is a clear shine.

Want to promote this print process to your customers? We’ve created this flyer to help you show off what spot gloss print can do. And, when you’re ready to order, you can order either through our catalog or on Navitor.com.

What do you like best about the look of spot gloss? We’d love to see you join the conversation in the comments below.

Want Proof That Your Enhanced Finishes Design is Perfect? Order One!

We understand that when you place an order for one of our new enhanced finishes products you want it to be perfect. Because of this, we’re offering you the option to place an order for a single announcement, business card, or postcard to proof your design! This allows you to check a printed proof of the design for a small fee before committing to your order, and it allows you to adjust the design as needed for a small additional fee for each proof.

How it Works
These proofs can be placed as a manual order or online orders—simply place your order with a quantity of one! Proofs cannot be ordered alongside any other products, but you can order press proofs of multiple Enhanced Finishes print pieces in one order. Once you’ve ordered, we’ll print it for you and send it via 2nd day air so that the proof is in your hands quickly.

The Next Step if You Ordered Online

Like what you see? Your file’s ready to go! If you placed your order online, go to the My Account page, click on Reorders (online orders only) and select your order of one via order conformation, PO number or customer information and click Start Reorder. Once you’re there, select Edit next to Product Specifications, and update the quantity.

Once you’ve taken a look at the proof, you might want to adjust your file. To order, go to the My Account page, click on Reorders (online orders only) and locate your order and click Start Reorder. Once you have located the order, click Edit next to Front Artwork to upload the new artwork and order a single-quantity proof of this new version.

The Next Step if You Ordered Through the Catalog

As with online proofs, once you have examined the proof you can contact us to order a higher quantity of the proofed item or adjust your file and create another proof. If you would like more guidance when creating another proof of your artwork—or if you want additional guidance before you start—contact your customer service team to learn more.

Ready to get started? Take a look at the updated digital copy of our catalog or visit the Enhanced Finishes page on Navitor.com to place your order.

They’re Here: NEW Enhanced Finishes!

raised foil, spot uv gloss, raised spot uv gloss for postcards, business cards and announcementsAre your customers looking for a way to add polish to their business cards to make a more memorable first impression? Do they want to make their announcements for an upcoming event extra-special? Do they want the postcard for their next mailing to be truly showstopping?

We’ve got the products for you.

Navitor has debuted three new print processes: raised foil, raised spot gloss, and spot gloss. These processes are a striking addition to a wide variety of print projects. Here’s what you need to know.

Raised Foil: Nine Colors to Choose From

Raised foil creates the look of foil with the tactile appeal of a raised surface, and we’re excited to debut this new print process with a wide selection of foil colors! If your customer is looking for a classic look, take a look at gold and silver raised foil; these are classic metallic colors that are a great fit for brands looking for polished, professional appeal. They can also consider dull gold and dull silver for a similar look with more muted shine.

But their options don’t end there. Your customer can get creative with light blue, red, green, or black at the same price point as classic gold and silver options. And if your customer is looking for a trendy way to capture attention, holographic raised foil is available at a slightly higher price.

Spot Gloss: Just Where You Want It

Does your customer want to add emphasis to the most important parts of their design? They should consider spot gloss. Spot gloss, also called spot UV, allows them to apply a glossy coating in selected areas. They can use it to highlight their logo, the most important text on their print piece, part of an image, and more.

You can also achieve a more subtle look by using spot gloss as a design element in areas where there is no print or in areas where you have used a flood coat to apply a single color. This will create a surprising pop of shine from certain angles, making it a great way to add an unexpected design element or to create a pattern with flair.

And if your customer wants to add dimension to their spot gloss print…

Raised Spot Gloss: Bringing Gloss to New Heights
Love the look of spot gloss but want the tactile appeal of a raised surface? Raised spot gloss is here to deliver! You can use raised spot gloss similarly to spot gloss, but in addition to the pop of shine it will create a raised surface for even more emphasis.

Want to Know More?
If you’re looking for more information, we have a variety of different options for you! Click here to explore the products available, or download a flyer to help you introduce these new print processes to your customers. If you want to learn more about how to create the designs for these print pieces, click here for the detailed instructions you will need to create your Enhanced Finishes press files.

Are you excited about these new print processes? We’d love to see you join in the conversation in the comments below.

Summer is Coming! Here’s Your Chance to Save

Your customers have a lot of events to prepare for now that warm weather is finally here. They might be hosting sidewalk sales to bring more foot traffic into their store. They might be preparing to host a booth at the commercial building of a fair or sponsor an upcoming community event. They might want to replenish their supply of business essentials. They might have new products that they need to inform customers about.

And you’ve got the print pieces they need to make that happen.

Not only is this the perfect time to reach out to your customers about their summer print needs, but it’s also a great time to save!

Reaching Out Early for Summer Events
If your customer has events coming up, it’s a good idea to reach out early so that they can place an order for the print they need. Not only will this help ensure that you have the opportunity to save on your order—more on that in a moment—but it will also ensure that your customer’s order is in hand early and ready to go whenever their event arrives.

Want to Save?
To celebrate summer, we are offering 50% off any form of shipping for custom stationery items. Simply include coupon code CPN-50SH9 with catalog orders or visit Navitor.com to save automatically on all these products:

This offer excludes promotional products and holiday and greeting cards.

What print pieces do your customers look for as summer approaches? We’d love to see you join the conversation in the comments below.

Which Envelope is Right For Your Customer?

When your customer is creating a mailing, the envelope it’s sent in will be the recipient’s first impression—they want it to be perfect! That means not only creating the right design but choosing the right envelope for the job. So, which envelope is the right one for your customer?

How Much Polish Does Their Mailing Need?
Finding an envelope to match the feeling of your customer’s mailing is essential. Stationery envelopes are designed to accompany letterhead, and come in stocks to match. They are good for communications that need an additional bit of professional polish, like official company letters or letters to important clients.

Business envelopes, on the other hand are a good option for everyday use in mailing invoices, account statements, and other informational pieces.

And if your customer is looking for a way to send catalogs and other oversized documents, mailing envelopes create a similar look to business envelopes but are made in larger sizes to suit those oversized contents.

Big or Small?
When your customer is sending a large mailing or an informational piece, they might want to consider the size of that mailing piece. Smaller pieces like brochures or rack cards are a perfect fit for business envelopes. Even better than the perfect fit, a branded envelope is a great way to add a bit more professional polish to the mailing piece and another chance to incorporate the logo for an added boost to brand recognition.

However, if your customers aren’t familiar with envelope sizes, you might want to review the options with your customer: #6 ¾ (3 5/8”x 6 ½”), #9 (3 7/8”x8 7/8”) and #10 (4 1/8”x 9½”). Our stationery envelopes come standard in the #10 size.

On the other hand, big documents like catalogs or booklets could do with a larger envelope, and we offer those, too! Choose from 6”x9”, 9”x12”, or 10”x13” to create a mailing envelope sized for your customer’s document.

What Seal Do They Want?
Your customer might not give much thought to their envelope seal options, but they are also an important thing to consider. When they are looking at business envelopes, standard gum flap envelopes are probably most familiar to your customers, using an adhesive that must be moistened before sealing the envelope.

However, standard gum flap envelopes might not be a good choice for customers who are going to be sending many pieces of mail in a short period of time. Peel and seal envelopes use an adhesive strip with a peel-off cover, while flip and seal envelopes require a quick press to seal. Both of these are good options for larger mailings as a result.

How do you determine which envelopes are right for your customers? We’d love to see your recommendations in the comments below.

Three Simple Tips for Designing a Better Form

When your customer comes to you for a form, they have a lot of options to choose from. This is especially true if they are ordering a custom form where their form can truly be a canvas for anything they want to print. With so many options, you might be called on to help your customer create a custom form, and designing a form for them is a great opportunity for you to help them create an even more effective form. Here are our tips for designing a better form.

1. Make it Clear What Information Your Customer Needs
Your customer’s form is, first and foremost, a practical piece of print. It’s the essential information for a client’s order, the receipt for a catered event, a record of services provided, or some other important documentation. That’s why it’s important to make it very clear what information the reader needs to provide. Use simple words like “name” or “zip code” and use readable fonts.

And, when you’re creating a custom form, it’s also important that you don’t include information that doesn’t need to be there. After all, why make space for information that you don’t really need? Not only will unused information make the form look cluttered, it can make it more difficult for the person filling out the form to navigate. Streamlining the form can help make it even more clear how the form should be filled out.

2. Avoid All Caps
Including text in all caps creates a very uniform look, but it makes forms much harder to read! This means that the forms will be much harder to fill out, and that will make them take longer to fill out and to process.

3. Embrace Personalization
Your customer has worked hard on their brand, and if you’re creating a custom form for them you should highlight that brand! Not only does this give them a chance for better brand recognition among their clients, but it gives them a new promotional opportunity with every form. They can highlight their logo, include full color photographs of new products, and more.

Do you design custom forms for your customer? How do you ensure that they are effective? We’d love to see your suggestions in the comments below.